
For whom is this description?
- You use a Shelly 3EM to measure the electricity consumption of your house or apartment.
- You operate a photovoltaic system whose surplus is fed into the public grid (and this is not connected to a separate electricity meter or the like).
- You use HomeAssistant to measure your energy consumption and control your home automation.
- You want to see exactly how much of your produced electricity is fed into the grid and how high the self-consumption is, but have the problem that the Shelly 3EM can unfortunately display this correctly, because the Shelly can not (yet) balance.
Changelog
2023-07-03:
- I am working on a “configurator” that creates your individual configurator.
- “power_solargen” was added to the configuration because some people had problems with “power_export_daily”.
Why can’t I see directly in the Shelly 3EM how much power I have fed in?
Basically, it must be said that the Shelly 3EM does everything correctly and you can see the electricity that is fed in technically correctly displayed. However, this is not true “billing-wise”. Because if you compare the power consumption in the Shelly with those on your electricity meter, you will find sometimes significant differences.
Why: Your electricity meter balances, the Shelly 3EM does not. What does this mean?
For this, we have to make a short excursion: Your household electricity comes to your home via three phases – this is called three-phase alternating current and is a European standard. In short: Three power lines with 230V voltage come into your house / apartment. Each of your consumers (lamp, socket, etc.) is connected to one of the three phases. Also the balcony power plant. If your balcony power plant generates more electricity than the consumers on the phase need, the surplus electricity is fed into the grid. The surplus electricity can also not jump to the other two phases, that is technically not possible.
Your electricity meter is – almost always – balancing. With balancing meters, the consumption and yields of all three phases are offset against each other before they are displayed on the electricity meter. So you don’t see how much was consumed or generated on the respective phases, you only see the result of the offsetting. The meter behaves in the same way when you feed in electricity on one phase. The balancing electricity meter offsets the feed-in on one phase with the consumption of the other two phases. This is a good thing, otherwise you would have less of a reason to buy a balcony power plant.
The Shelly 3EM cannot balance – it looks at phase by phase. Although it was announced a long time ago that this feature would be added in a software update, this is not yet the case. But that’s not so bad, we simply map that in HomeAssistant, which is in operation with me anyway.
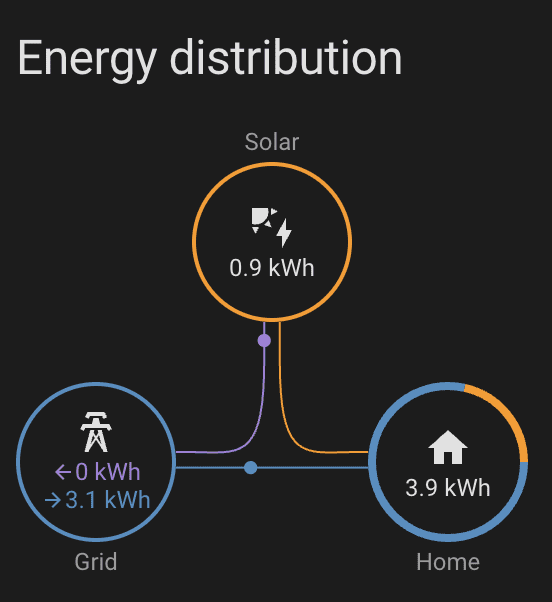
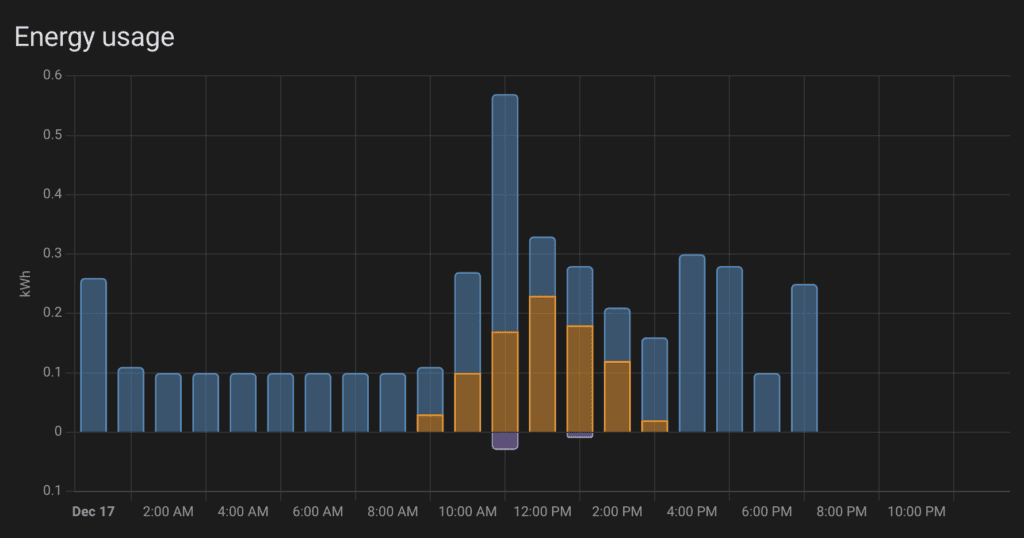
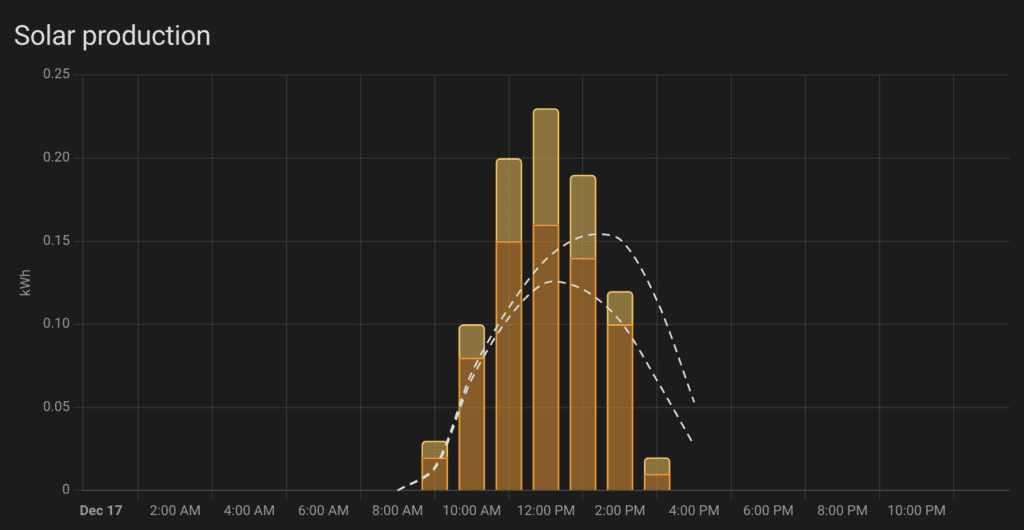
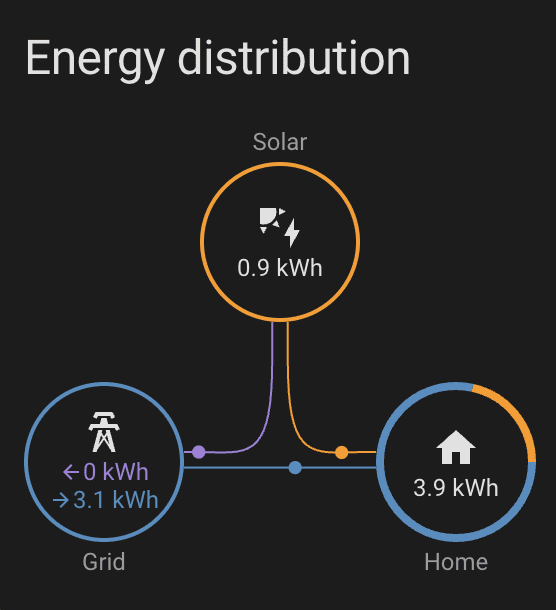
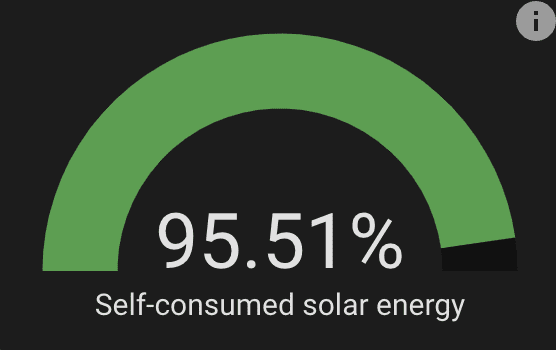
In HomeAssistant you also get such nice overviews on which you can see very clearly how many kilowatt hours you have drawn from the grid, how much solar energy has been produced and how much has been self-supplied.
What is the structure of the setup?
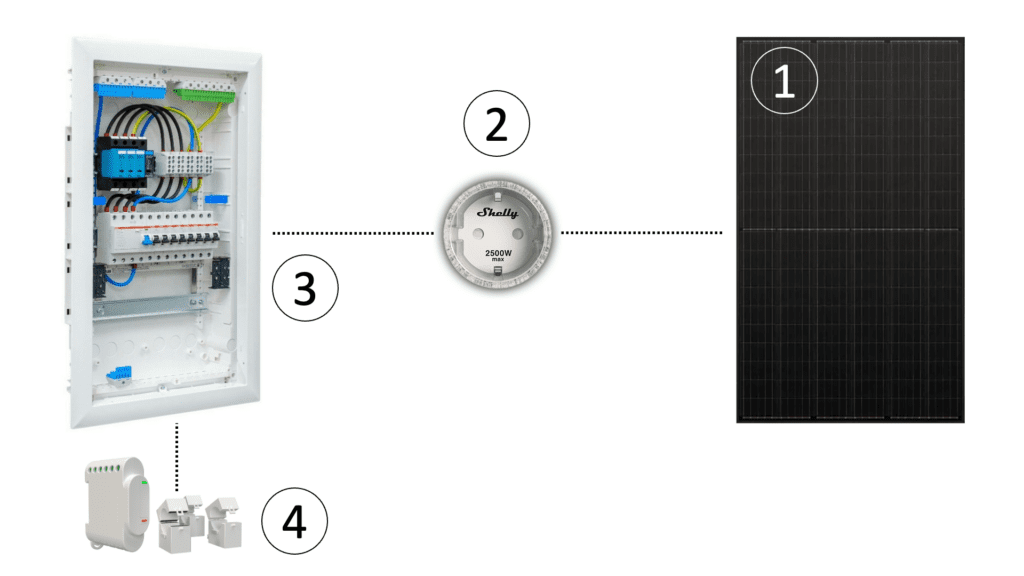
- The PV module is connected to your microinverter. In my case, this is called a balcony power plant (BKW).
- The micro inverter is connected to a Shelly Plug S. This smart off and on switch measures the power consumption, here the power generation by the PV module.
- The generated current of the PV module ends up at one of the three phases in the “fuse box”.
- The Shelly 3EM is installed in the fuse box and monitors the power consumption – both the purchased power and the injected power. Instructions on how to install the Shelly 3EM can be found here.
Prerequisite
This manual assumes that your Shelly 3EM is running correctly and is connected to your network. This tutorial also assumes that Home Assistant is installed on the same network and that Shelly 3EM with Shelly Integration is already integrated there.
Step by step guide
1. Install the File Editor add-on in Home Assistant
To open the configuration file in Home Assistant, you should install the “File Editor” addon. This is the easiest way to change the configuration. Do the following:
- Open HomeAssistant in a browser
- Click on “Settings
- Then click on “Add-ons
- Click on “Add-On Store
- Enter “File editor” in the search field
- Click on “Install
- Activate the following parameters:
- “Start on Boot”
- “Show in Sidebar”
- After the installation you should see the menu item “File editor” on the left side, click on it.
- After that you should see a folder icon at the top, click on it.
- Then open the file “configuration.yaml” in the file list.
2. Change the “configuration.yaml
Next, copy the yaml code below into the “configuration.yaml” file you opened with the file editor from the previous step. Just add it at the very end and do not change the existing configuration.
It may be that you have to adjust something: In the file you will find the three names of the Shelly 3EM phases in Home Assistant sensor.shelly3em_channel_a_power, sensor.shelly3em_channel_b_power, sensor.shelly3em_channel_c_power.
You need to replace these with your respective names for the “power” entity of the Shelly 3EM. For me, the names were automatically named this way when integrating the Shelly 3EM into HomeAssistant. If you have the same names, then everything is good.
Configurator
You have the option of customizing the configuration yourself using the text file below or you can have everything generated using the configurator.
sensor:
  - platform: template
    sensors:

      # Template sensor for values of power import (active_power > 0)
      power_import:
        friendly_name: "Power Import"
        unit_of_measurement: 'W'
        value_template: >-
          {% if (states('sensor.shelly3em_channel_a_power')|float + states('sensor.shelly3em_channel_b_power')|float + states('sensor.shelly3em_channel_c_power')|float) > 0 %}
            {{ states('sensor.shelly3em_channel_a_power')|float + states('sensor.shelly3em_channel_b_power')|float + states('sensor.shelly3em_channel_c_power')|float }}
          {% else %}
            {{ 0 }}
          {% endif %}
        availability_template: "{{
            [ states('sensor.shelly3em_channel_a_power'),
              states('sensor.shelly3em_channel_b_power'),
              states('sensor.shelly3em_channel_c_power')
            ] | map('is_number') | min
          }}"

      # Template sensor for values of power export (active_power < 0)
      power_export:
        friendly_name: "Power Export"
        unit_of_measurement: 'W'
        value_template: >-
          {% if (states('sensor.shelly3em_channel_a_power')|float + states('sensor.shelly3em_channel_b_power')|float + states('sensor.shelly3em_channel_c_power')|float) < 0 %}
            {{ (states('sensor.shelly3em_channel_a_power')|float + states('sensor.shelly3em_channel_b_power')|float + states('sensor.shelly3em_channel_c_power')|float) * -1 }}
          {% else %}
            {{ 0 }}
          {% endif %}
        availability_template: "{{
            [ states('sensor.shelly3em_channel_a_power'),
              states('sensor.shelly3em_channel_b_power'),
              states('sensor.shelly3em_channel_c_power')
            ] | map('is_number') | min
          }}"

      # Template sensor for values of power consumption
      power_consumption:
        friendly_name: "Power Consumption"
        unit_of_measurement: 'W'
        value_template: >-
          {% if (states('sensor.power_export')|float(0)) > 0 and (states('sensor.power_solargen')|float(0) - states('sensor.power_export')|float(0)) < 0 %}
          {% elif (states('sensor.power_export')|float(0)) > 0 and (states('sensor.power_solargen')|float(0) - states('sensor.power_export')|float(0)) > 0 %}
            {{ (states('sensor.power_solargen')|float(0)) - states('sensor.power_export')|float(0) }}
          {% else %}
            {{ states('sensor.power_import')|float(0) + states('sensor.power_solargen')|float(0) }}
          {% endif %}


  # Sensor for Riemann sum of energy import (W -> Wh)
  - platform: integration
    source: sensor.power_import
    name: energy_import_sum
    unit_prefix: k
    round: 2
    method: left

  # Sensor for Riemann sum of energy export (W -> Wh)
  - platform: integration
    source: sensor.power_export
    name: energy_export_sum
    unit_prefix: k
    round: 2
    method: left

  # Sensor for Riemann sum of energy consumption (W -> Wh)
  - platform: integration
    source: sensor.power_consumption
    name: energy_consumption_sum
    unit_prefix: k
    round: 2
    method: left

utility_meter:
  energy_import_daily:
    source: sensor.energy_import_sum
    name: Energy Import Daily
    cycle: daily
  energy_import_monthly:
    source: sensor.energy_import_sum
    name: Energy Import Monthly
    cycle: monthly
  energy_export_daily:
    source: sensor.energy_export_sum
    name: Energy Export Daily
    cycle: daily
  energy_export_monthly:
    source: sensor.energy_export_sum
    name: Energy Export Monthly
    cycle: monthly
  energy_consumption_daily:
    source: sensor.energy_consumption_sum
    name: Energy Consumption Daily
    cycle: daily
  energy_consumption_monthly:
    source: sensor.energy_consumption_sum
    name: Energy Consumption Monthly
    cycle: monthly
After you have added the configuration at the end of the “configuration.yaml” please do the following steps:
- Click on “Developer Tools” in the lower left corner of the main menu.
- Then click on “Check configuration
- If the message “Configuration will not prevent Home Assistant from starting” appears, everything fits.
- Then click on “Restart
- After 1-2 minutes HomeAssistant is available again and has loaded the new configuration.
3. Configure the Energy Dashboard
In the last step, we configure the Energy Dashboard so that the new entities are also integrated there and the correct values are displayed. To do this, we proceed as follows:
- Click on “Settings” at the bottom left of the main menu.
- Then click on “Dashboards”.
- Then click on the “Energy” dashboard.
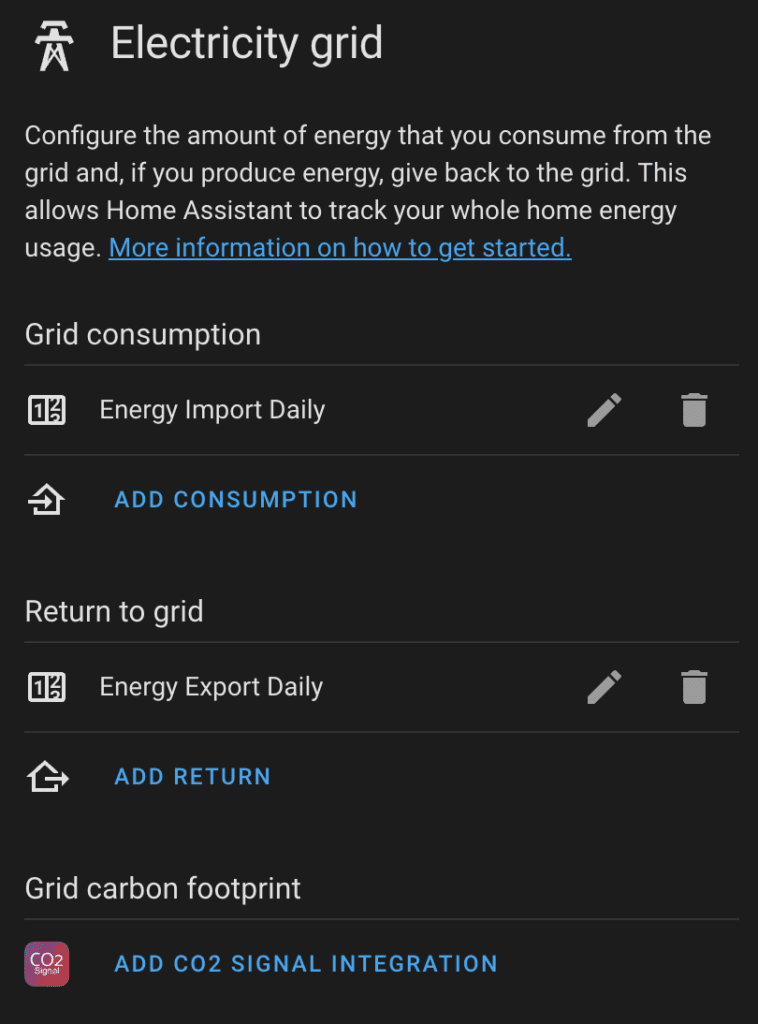
- Add the new entity “Energy Import Daily” to “Grid Consumption”.
- Add the new entity “Energy Export Daily” at “Return to Grid”.
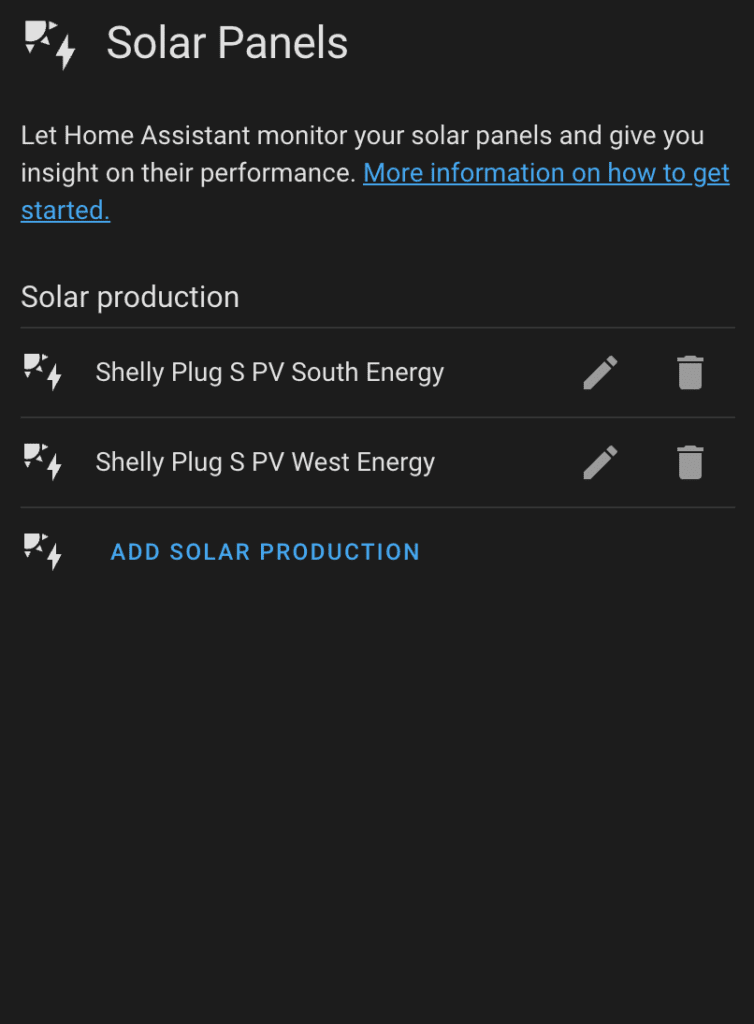
- At the “Solar Panels” please add the meter for your PV production. In my case this is two Shelly Plug S, because I have two modules.
In the end, the configuration for me looks like this:
This is what it looks like in the Home Assistant Energy Dashboard
You can now clearly see the power consumption from the grid and your photovoltaic system and how much of your self-produced electricity has been consumed by you – at least mathematically.
Please note: It takes a while for you to see data in the Energy Dashboard. It takes at least an hour, but can take up to 3 hours. Have a little patience!

Feel free to leave me comments if the description has weaknesses or can be improved! Many thanks to James from whom the original version came.


Leave a Reply