
Summary
In this post I show how to use excess electricity from your photovoltaic system or a balcony power plant with an infrared heater to heat your apartment or house. This way you will use less electricity and save a little heating costs at the same time. After you have implemented these instructions, your infrared heater will switch on whenever you have a surplus of electricity defined by you. And of course, the system also switches off again if the surplus is suddenly no longer there, because the sun is no longer shining or someone has suddenly switched on the dishwasher.
For whom is this description?
- You use a Shelly 3EM to measure the power consumption of your house or apartment.
- You operate a photovoltaic system whose surplus is fed into the public grid.
- You use HomeAssistant and can see exactly your current surplus in Home Assistant. If this is not yet the case, then you better start with this article.
- You have a Shelly Plug S (of course it works with other smart plugs, but this tutorial is designed to use the Shelly Plug S).
- You have an electronic heater, preferably an infrared heater. I have linked my model here. The important thing is that the power matches your typical PV surplus. My infrared heater uses 130 watts and fits quite well with the surplus on a sunny day in the fall and spring, which time of year is still heating.
What does the structure of the system look like?
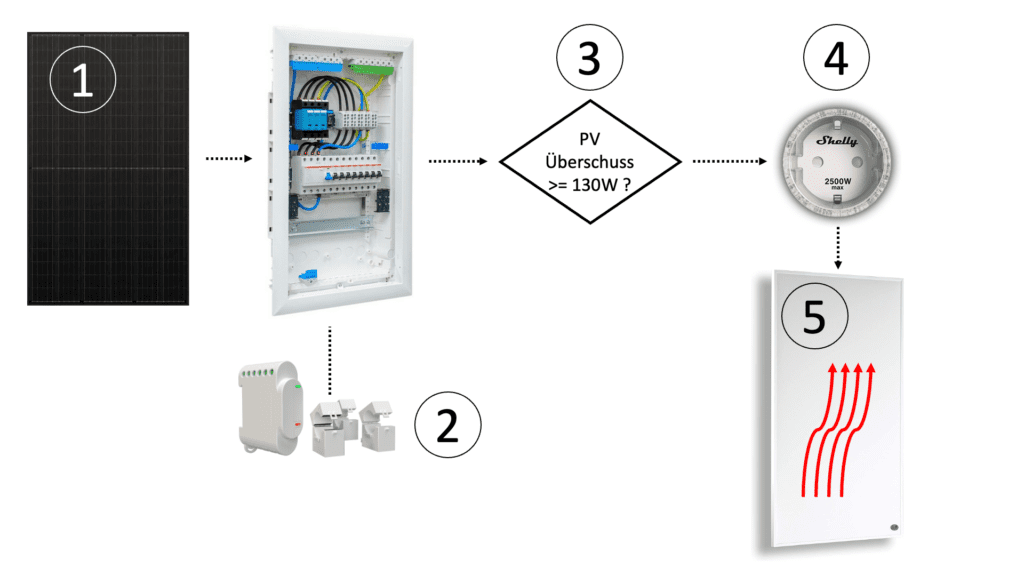
- The PV module is connected to your microinverter. I call this a balcony power plant (BKW).
- You have installed a Shelly 3EM in your fuse box.
- Use Home Assistant for your Smarthome and you can measure your surplus (balancing).
- You have installed the add-on “File Editor” in Home Assistant.
- Your electric heater is connected to a Shelly Plug S (or similar).
- The electric heater is adjusted to your surplus and not too big. In my case, the infrared heater has 130 watts.
Step by step guide
1. Measure the current surplus
After you have already integrated your Shelly 3EM into Home Assistant, you still need an entity that shows you the current power consumption or surplus. This entity will be the “trigger” that triggers our automation. Here is the YAML code:
      power_current:
        friendly_name: "Power Current"
        unit_of_measurement: 'W'
        value_template: >-
            {{ states('sensor.shelly3em_channel_a_power')|float + states('sensor.shelly3em_channel_b_power')|float + states('sensor.shelly3em_channel_c_power')|float }}
        availability_template: "{{
            [ states('sensor.shelly3em_channel_a_power'),
              states('sensor.shelly3em_channel_b_power'),
              states('sensor.shelly3em_channel_c_power')
            ] | map('is_number') | min
          }}"
Do the following:
- Open HomeAssistant in a browser
- Click in the menu on the left side the menu item “File editor”.
- Then you should see a folder icon at the top, click on it.
- In the file list open the file “configuration.yaml”.
- Insert the above YAML code in the template section.
- Click “Save”.
- In the bottom left corner of the main menu click on “Developer Tools”.
- Then click on “Check configuration
- If you get the message “Configuration will not prevent Home Assistant from starting” everything fits.
- Then click on “Restart
- After 1-2 minutes Home Assistant is available again and has loaded the new configuration.
2. Create automation rules in Home Assistant
We need two automation rules. The first one turns on the heating when I have more than 130 watts surplus:
- Open HomeAssistant in a browser
- Click in the menu on the left side the menu item “Settings”.
- Click on “Automations & Scenes”.
- Clicks on “+ Create Automation”.
- Clicks on “Start with an empty automation”.
- Add the type “State” as “Trigger”.
- Search for “power_current” in the “Entity*” field and select it from the drop-down list.
- Add the type “Numeric state condition” as “Condition”.
- Search for “power_current” in the “Entity*” field and select it from the drop-down list.
- Enter the value “-130” in the “Below” field. This corresponds to the necessary excess power and also represents the power consumption of my infrared heater. You have to adjust this value to your situation if necessary.
- Add a second “Condition”.
- Select your Shelly Plug S as “Entity*”.
- In the field “Condition” please set that the Shelly Plug S should be “OFF”. Background: Assuming the heating is already on, you don’t want to try to switch it on again.
- Adds an action.
- Select your Shelly Plug S as “Entity*”.
- In the field “Action” please select that the Shelly Plug S should be switched on.
- Click on “Save”, give the rule a name, then the first of the two automations is created.
The second automation rule turns off the heating when I draw more than 10 watts from the mains. Why 10 watts? Well, at the moment before the first automation rule takes effect, we have a surplus of 130 watts. If the electric heating is then switched on, the power consumption is immediately increased. Mathematically, I should use 0 watts here, but I give 10 watts “buffer” to avoid that the system is switched on and off too often because the power consumption fluctuates or the power of the PV modules fluctuate too much. The procedure is very similar to the one above:
- Open HomeAssistant in a browser
- Click in the menu on the left side the menu item “Settings”.
- Click on “Automations & Scenes”.
- Clicks on “+ Create Automation”.
- Clicks on “Start with an empty automation”.
- Add the type “State” as “Trigger”.
- Search for “power_current” in the “Entity*” field and select it from the drop-down list.
- Add the type “Numeric state condition” as “Condition”.
- Search for “power_current” in the “Entity*” field and select it from the drop-down list.
- Enter the value “10” in the “Below” field.
- Add a second “Condition”.
- Select your Shelly Plug S as “Entity*”.
- In field “Condition” please set that the Shelly Plug S should be “ON”. Background: Assuming the heating is already off, you don’t want to try to switch it off again.
- Add an action.
- Select your Shelly Plug S as “Entity*”.
- In the field “Action” please select that the Shelly Plug S should be switched off.
- Click on “Save”, give the rule a name, then the first of the two automations is created.
Outlook
I will now observe the installation well and calculate the profitability. If I have more, additional electricity “left over” I will install another infrared heater and switch this step by step.


Leave a Reply